By no means does every amateur gardener have the time capacity to replace the plants in their strawberry patch with new specimens each year. Not to mention the financial burden of purchasing young plants, because who cultivates strawberries exclusively in the home garden?? Time-saving and cheaper proves to be a perennial culture, provided that the inhibitors in the old foliage are removed by a targeted pruning.
Strategically smart amateur gardeners during this growing season identify the most irreproachable mother plants, as a basis for agile offspring. The following instructions document how to smoothly succeed in the care aspects of cutting and propagating strawberries.
Experience has shown that strawberries produce the highest yield in the first year of standing. In the second year, the absolute quantity decreases, but in return the size of the individual fruits increases. Of course, after three years at the latest, the glory is over, because the Fragaria deteriorate so much in every respect that the care effort is no longer worth it.
Cutting after the harvest
When the last fruit is picked, strawberries take 2 to 3 weeks to regain their strength. Then the plants prepare for the next season and at the same time get ready for the cold season. The old foliage turns dark because it accumulates fiber that a strawberry plant cannot excrete. These chemical compounds are also called inhibitors by experts because they hinder the formation of new buds. Consequently, it is essential for vitality that the spent parts of the plant are eliminated.
- Cut off discolored foliage and wilted flowers to just above ground level.
- The bud heart of the strawberry plant must not be damaged in the process.
- Cut back to the base all tendrils that are not used for propagation.
On this occasion, the experienced gardener inspects each plant to determine if any signs of damage are evident. Any potential source of infestation is removed immediately. The cuttings should not be left in the bed under any circumstances, but should be completely disposed of in the household waste and not in the compost.
Low-growing strawberry varieties that serve as ground cover are cut unceremoniously using a lawn mower.
Pruning climbing strawberries
Harvesting ripe strawberries is traditionally done in a strongly stooped position, which sooner or later leads to back pain. Not so with amateur gardeners who cultivate climbing strawberries. These will climb elegantly up the fence, trellis and house wall, provided they are in sunny locations. Harvesting and care do not require laborious stooping and, consequently, give all the more pleasure in the work. This applies in the same way to annual pruning, which is just as necessary here as with Fragaria growing at ground level.
- In November, cut off all unwanted tendrils.
- Thin out exhausted, wilted leaves down to the heart bud.
- Break off any remaining inflorescences by hand.
After overwintering, the climbing strawberries will sprout again vigorously and quickly present their pretty flowers.
Pruning hanging strawberries
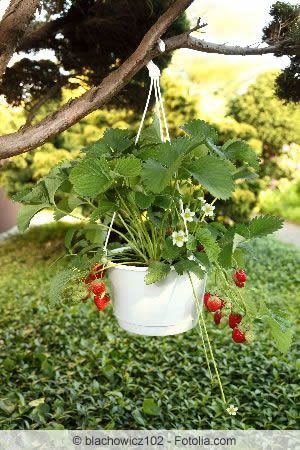
Experienced growers have succeeded in creating special strawberry varieties that are excellent to cultivate in a hanging basket or in a planter box along the balcony railing. Since they are a cross between the monthly strawberries and the climbing strawberries, they bear small, sweet fruits without interruption. This continuous use takes its toll on the plants, so in late autumn pruning should drastically reduce energy consumption.
- During the vegetative phase, immediately cut out yellow leaves.
- Following the harvest, cut off all stolons.
In order to create beautiful, long tendrils at all, the first flowers should be broken out in May. If the first runners sprout from the rootstock, the expert amateur gardener places them on the edge of the planter so that they can find their way down unhindered. After pruning, repeat this procedure as soon as the hanging strawberries sprout again.
Methods of propagation
Propagating strawberries is less a matter of gardening skill and more a botanical strategy game. The more planned this issue is, the more seamlessly high-yielding crops will follow one another from year to year, the seasonal harvest period can be extended, while at the same time the budget for young plant acquisition is noticeably spared. This includes, for example, that no season should be missed in order to propagate the highest-yielding plants, even if basically two- or three-year cultivation is used.
The weakest plants are replaced by the offspring of the top performers, so that at no time the entire stand ages at the same time, but is rejuvenated in parts on a rolling basis. Smart hobby gardeners handle the propagation in such a way that during the vegetation phase new seedlings are planted every 14 days, which prolongs the duration of the harvest. The hobby gardeners can choose among various methods to multiply their ‘best bearers’.
Sowing
It is not only the financial aspect that makes the sowing of strawberries so interesting. It is rather the exciting component to witness firsthand how the tiniest seeds develop into imposing strawberry plants.
Harvest strawberry seeds yourself
Of course, there is nothing to stop you from buying the seeds of your favorite varieties in stores. More captivating, on the other hand, may be the extraction of the seeds by hand. The seeds are a gathering fruit and are located on the surface of a strawberry in the form of small, yellow-green nuts.
To separate them from the flesh of the red flower axis, the strawberry is first dried. As a rule, after some time the seeds fall off all by themselves and can be collected. The fresher they are at the start of sowing, the higher the chance of germination. If they need to be stored for some time, a dark glass jar with a screw cap is best, stored in a cool, not too bright place.
Growing in the room
The best time to sow strawberry seeds is February and March. This makes sense, because experience shows that it takes longer until germination starts. Planting is then done in April or May. Alternatively, sowing takes place in the summer, when August is targeted as the traditional planting date. In both cases, the strawberries are harvested for the first time the following year.
Materials list
- Strawberry seeds
- Seed tray or soil press pots
- Nutrient-poor sowing soil
- Water spray bottle, fine sieve
- Cling film or propagator
- Pricking stick
- Peat growing pots
If you plan to sow several varieties of Fragaria, you should have some labels ready to label the different pots. Before starting, place the seeds in a bowl of water to pre-swell them. Then the skilled gardener fills the seed tray with the lean substrate and scatters the seeds on it. He presses the seed lightly and sifts it thinly with substrate. Provided that they are light germinators, of course, there is no need for a layer of soil. With the help of the water spray bottle, the sowing is moistened without completely soaking the sowing soil.
Placed in the greenhouse at a bright, not full sun window place, it can become a test of patience until the strawberry plants are large enough to be separated. If no indoor greenhouse is available, a cover of transparent film will do the job of providing a conducive, warm and humid climate. After 6 to 8 weeks, the seedlings have reached a height of 2 to 3 cm and are pricked out. Visually, this circumstance is recognizable by the fact that in addition to the cotyledons have appeared at least 3 to 4 true foliage leaves. The effort required for later planting in the bed is reduced if the strawberry plants are placed individually in peat pots. Over time, these form a symbiosis with the root ball and are planted together, without the hassle of repotting.
The small seeds can be spread more easily if they are mixed with a little bird sand.
Offshoots
As strawberry plants grow, they spread long tendrils in the bed, which are great for the classic version of propagation. Much less laborious than sowing under glass, allotment gardeners have always favored this method.
Materials list
- 9 cm pots made of plastic or clay
- Compost soil-sand mixture
- Wire staples or tent pegs
- razor blade or thin knife
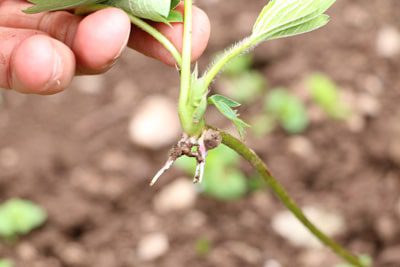
After this year’s harvest is over, the amateur gardener selects suitable offshoots of his best strawberry plants, which have not yet formed roots. Where they run, he digs a pot filled with compost soil half or two-thirds into the ground. Now lightly score the place of the vine, which is above the pot and dig it into the substrate a few centimeters. Then fix each stolon with wire staples or tent pegs from camping gear.
While the mother plant continues to provide nutrients to its offshoots, a new root system forms from the wound tissue. The following spring, a vigorous young plant has formed that is independent enough to be separated from the mother plant.
Since this propagation is tackled when the harvest is completed, it makes sense to mark the top performers with the highest yield in time.
Frequently asked questions
Can I use offshoots for propagation that have already taken root in the soil?
This is quite possible. In this case, wait until the root system is strong enough. If you feel a clear resistance when you pull the vine, it should be mature enough. Now dig up the offshoot widely, cut it from the mother plant and place it in the new location. Alternatively, cultivate the young plant in a flower pot in a bright, warm place for some time beforehand. It is important to note that the tendril and substrate do not dry out at any time.
How to propagate my hanging strawberries?
In order for the tendrils to come into contact with substrate, ideally take the hanging basket down and place it on a table. Place the pots filled with compost or potting soil all around, put the scribed runners on them and cover them with the substrate. The tip of the shoots should still be visible. If new shoots appear there in spring, this is the signal that a strong root system has formed. Separation from the mother plant may now take place, so that the young plant can be further cultivated in its own pot.